Home of The Shuttle...
Home The Cars The Humor Contact Me
Visitor Number
|
Welcome
to
TurboCelica.com.. Home of The Shuttle... |
Navigation
Menu Home The Cars The Humor Contact Me |
Visitor Number |
| Updated: May 22, 2021 | |
|
Chris' '90 Toyota Celica
All-Trac Turbo
(aka "The
Shuttle") The Story from Day One |
Thanks for stopping by to read-up on the story behind The Shuttle. As of this writing, I've owned the car for just over seven years. During this time, I've gone through various stages with the car. At first, my thought went something along the lines of, "This car is rare. I should keep it in stock condition." Then, I found Sport Compact Car magazine, and read about Project MR2.. "Hmmm... Perhaps a few reversible mods, in the name of better performance, would be fun!" or so I thought. "Reversible. Yeah. Sure. I can do that."
That was then, this is now. <laughs> At this point, I think it's safe to say that reverting back to original, bone-stock condition is pretty much next to impossible. Ok, so nothing is impossible given ample doses of time and money. But, somehow, I doubt anyone will ever forsake The Shuttle for a stock All-Trac / GT4. Good or bad, that's for you to decide.
The past seven years have taken me through a variety of toils and temptations. Initially, I thought I'd be happy with mild bolt-ons, and a fresh rebuild with forged pistons. However, as the adage goes, "Life is what happens when you make plans." Stuff happens and plans change. From an initial budget of $3500 to a definition of The Shuttle that includes the phrase, "a hole in the ground with four wheels I pour money into," I've enjoyed a good many ups and downs with this little beast. Over these years, I feel like I've been on the forefront of GT4 performance, frequently charting new territories. While some folks are putting fans on their stock ATA IC and trying to figure out how to put a zener diode across the map sensor in order to eliminate the factory-imposed 12 psi fuel-cut, I'm trying to insulate and thus raise the efficiency of my (then) custom Spearco WTA IC, as well as import a J-spec hood, front bumper, and larger ST205 brakes. And then there's the whole second rebuild where I chose to augment the 3SGTE's stock displacement with the JUN stroker crank, pistons and rods. More on that a bit later. Net-net.. while I've not been the first at everything, I have been on the bleeding edge, frequently incurring the R&D costs for a given mod, like finding affordable and readily-available valve springs.
Initially, I tracked the costs of everything I did to the car in an Excel spreadsheet. At any point in time, I knew the damage this car was having to my wallet. But, at some point during the build-up of the JUN stroker engine, I gave-up trying to keep track of the expenses. Actually, that's not entirely correct. I do have all the receipts from which I could compile a running total; I simply choose to not do this. So, at this point, I am choosing to play ostrich, with my head in the financial sand, so to speak. That said and all truth be told, I do keep a mental running-total, and it's really not that bad... at least, that's what I keep telling myself. <laughs>
April 1997 - I bought the car with 53K miles from a local Mercedes/Volvo dealership; the salesman said it was a recent trade-in from someone who bought a Volvo. Talk about a step backwards. But then this is what happens to left-brainers as they age. I digress...
First Set of Mods - Long about January 1998, and after reading several segments of Sport Compact Car's Project MR-2, I called Alamo Autosports (herein referred to as simply Alamo) to discuss my car with respect to the various modification they have been involved with on Project MR-2. After a few preliminary discussions on the phone, I made an appointment to visit their shop in Arlington, Texas, (between Ft. Worth and Dallas) on my next business trip to the Dallas area.
Upon arrival at Alamo Autosports, I met with Brice Yingling, the owner. We spoke for a good long while and we discussed my goals for my car, as well as the work they had been doing on Project MR-2. Overall, I was very impressed with Brice and his willingness to explain all aspects of the various modifications both used on Project MR-2 and suggested for my car. You can read more praise for Brice and his team at Alamo Autosports here.
During my visit, I expressed my preference to avoid mods that would become obsolete with other future mods. For example, I passed on upgrading the compressor wheel in my factory CT-26 turbo when I knew I'd ultimately upgrade to a larger turbo. So much care and attention was paid to not go down this route. As a result, we focused on those mods which were more long-lasting and permanent in nature. (And, for the most part, I've been successful in this endeavor in that I've been able to remove and sell all of the high-performance parts that have been installed and subsequently replaced with bigger and better high-performance parts (i.e. dual-feed fuel rail, G-Force ECU, HKS VPC & GCC.) As a result, we discussed many options for increasing performance and decided upon a staged approach to the build-up of my All-Trac. Stage 1 would consist of various mods that serve to either boost power by increasing the engine's ability to breathe easier, and maintain a margin of safety as the power increases.
March - June 1998 - The first batch of modifications, considered as Stage One, were performed. With these mods (listed below) and with boost at 1.0 bar,, the car felt significantly quicker. Boost was instantaneous, reaching a full 1.0 bar by 2000 rpms, and this resulted in an incredible amount of low-end torque. I recall giving a ride to a friend of mine who owns a turbo MR-2 with a large-and-laggy IHI turbo. He was very impressed with the torque and the overall increase in power and acceleration.
Power-adder mods
|
Safety mods
|
August 1998 - I relocated the battery to the trunk so that Alamo could relocate the intercooler from atop the engine to the side of the engine compartment in an effort to reduce absorption of radiant heat from the engine and turbo. I also installed a pair of intercooler temperature gauges that were bought from Powerhaus, a Porsche tuner in Arizona. Each gauge kit comes with two temperature probes and a gauge with a digital display and a three position switch that allows for the display of the temperature of each probe, or the difference in temperature between the probes. I installed these gauges across the intercooler's water and air-flow passageways in a manner so that one gauge provides water temps while the other provides air temps. In this fashion, I can monitor both the air and water temperatures both entering and exiting the intercooler, as well as the decrease in air temperature and increase in water temperature across the intercooler. With these gauges installed, I can watch these temps in real-time. And most of the time, I usually set the water temp gauge to display the water out temp, and the air temp gauge to display air temp out. Generally, these two temps are within 5 degrees of each other, and this leads me to believe there is additional efficiency to be found in manipulating the rate of water flow across the intercooler core, and how the end-caps introduce and evacuate the air-charge across the intercooler. More on this later.
October 1998
I returned to Alamo Autosports to implement Stage Two, which included:
At the same time, the water/air intercooler system was upgraded to include a large custom radiator in front of the A/C condenser. Previously, a pair of oil coolers had been fitted and these were proven to be unable to provide effective cooling to the water in the water/air intercooler system. This new front heat exchanger has clearly made a significant difference in lowering the temperature of water feeding into the intercooler, and this results in lower air-charge temps exiting the intercooler. I also fitted the car with a four-gallon water reservoir in the hatch area to hold 10-20 lbs of ice. This resulted in 34-35 degree F waqter entering the IC and 40 degree F air exiting the intercooler on a hot 90 degree F. Texas summer night. That's what I call an efficient intercooler.
With the boost remaining at 1.0 bar, the power was incredible. While the low-end power was reduced somewhat, the power came on very strong at 3500 rpms. And where the stock turbo would run out of steam at about 6000 rpms, this turbo kept making usable power through 7500 rpms. Whoa! Hello!
Engine Rebuild #1 -
March 1999
In this configuration, I drove the car till March 1999 when I pulled the engine to rebuild it.
Engine rebuild #1.
The rebuild itself went relatively smooth. The engine was bored 1mm and fitted with Arias flat-top forged pistons. The crank was polished. The block was decked .005".
The engine was reinstalled with a new ClutchMasters stage 3 HDTZ clutch
and pressure plate, along with a ClutchMasters lightweight aluminum
flywheel. During the engine rebuild, I also fitted a nitrous oxide
system to the back-side of the intake. The idea here was that the nitrous
system was to be used only to overcome turbo-lag, if needed. I also eliminated the T-VIS, and gave the
cylinder head a mild port job, a triple-angle valve job, and ceramic coatings on the combustion
chambers and exhaust ports. Additionally, the exhaust manifold was
ported and also received ceramic coatings as did the turbo turbine
housing. The crank secured with an ARP stud kit, while an ARP
head stud kit held an HKS 1.6 mm stopper head gasket in check.
"Houston, we have lift-off!"
Engine Rebuild #2 - May 1999
The new engine performed flawlessly for a very easy 600 miles during the break-in
period with a limit of 8 psi. However ...
"Knock knock..." "Who's there?" "Connecting rod." "Connecting rod who?" "Help me. I've slipped a rod bearing and I can't get up!"

...
the engine spun rod bearing #1 on the first run at full 15 psi of boost and
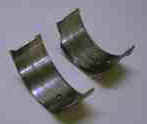
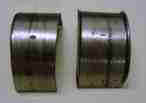
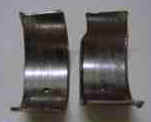
a 7500 rpm shift-point. After countless hours of analysis, I'm of the opinion that this rod bearing failed for no reason other than the machine shop's failure to resize the connecting rod's big-ends after replacing the rod bolts.
At any rate, I found myself at the point of pulling the engine out of the car, again. While debating the merits of turning the existing crank verses searching for a new or used crank, the folks at Alamo Autosports
encouraged me to consider rebuilding the engine once again, but this time using the JUN 2.2 stroker crank and pistons. After much internal deliberation concerning the level of insanity necessary to even remotely entertain the thought of paying $4200 for a the JUN stroker kit (crank and pistons) and the JUN rods, I placed my order and started waiting, and waiting, and waiting, for the parts to arrive from Japan.
The purchase of the JUN stroker kit was a defining moment in the build-up of this car. That was the point where I would no longer skimp on anything for this engine. And little did I know that it was only a new beginning for an even wilder engine build-up than
before. Prior to buying these JUN racing parts, the entire previous engine rebuild had cost less than the sum of these JUN parts. Can you say OUCH?
The head build-up. Ok, so I'm already geared-up to build an awesome short-block.. Now I needed to fortify the cylinder head to comparable specs. During the previous engine rebuild, the cylinder head had received a mild porting job, a triple-angle valve job, and ceramic coatings on the combustion chambers and exhaust ports. Ok, this is good, but what other improvements can I muster? So, along comes a message one morning from a fellow on the GT4 list that's selling a pair of brand-new, unused Blitz camshafts for the tidy sum of $670. Hmm.. Ok, I'm game. Certainly an engine with 10% larger displacement
can benefit from larger cams, I reasoned. Back on the phone to Alamo. "Hey, look what I found on the Internet. What? Now I need a set of lightweight titanium retainers, JUN makes
'em, and you happen to have a set in stock for me? Ok, here's my VISA number." I thought I was all set.
WRONG!
The relentless quest for suitable valve springs
Little did I know that the Blitz cams would cause the factory Toyota valve springs to come within .020" of complete coil-bind. As a result, I started a frustrating quest for replacement valve springs. Although JUN offered valve springs for the 3S-GTE, a set of these springs were not currently available in the US. Thus, I contacted all the usual
suspects, including Alamo, Norwood, Toysport and Toyomoto. Although Toysport indicated that they could source new, high-tension valve springs, along with new valves, they could never give me any definitive information as to the specs on the valve springs. The folks at Norwood offered to sell me the same springs used in SCC's Project MR-2 for $285, yet, these springs required cutting new spring seats in the head, and Norwood could not tell me any details on the durability of the head after machining the head for these larger
springs. Not. So I kept looking. A heard a rumor suggesting that since Yamaha had
had a hand in the design of both the 3S-GTE and Ford SHO engines, they might share
comparable valve springs. So, I called my Dad who is a parts department manager at a local Ford dealership and had him order a spring for me so that I could make some
measurements before ordering a complete set of 16 springs. Although my cost on these SHO springs were only $2.18 each, they were only sold in packages of four. So for just shy of $10 and a couple days in waiting, I had four new SHO valve springs.
Whoopie! Unfortunately, the SHO engine uses a higher installed height and would
have resulted in coil bind with the stock Toyota 3S-GTE cams. Redo from start... So long about this time, I had
sent so many emails to various people on the Internet that I was beginning to believe
that I would be forced to endure the wait for JUN to manufacture another set of valve springs and send them to the US for me.
Blah. No way. Then one day I received an email from a fellow in California at an engine shop that builds race engines for Formula 1. The fellow on the other end of the email suggested that I look into using an
inner spring from the small block Chevy V8. This was the breakthrough I needed. So after surveying the specs of various inner springs from several different valve spring manufactures, I
went with Engle Cams part number "361 inner". See my engine build-up specs for the
details on this spring. So with the new Engle springs and JUN titanium retainers, I was set to reassemble the head.
Engine coatings
My JUN 2.2 stroker engine received a number of various coatings at Polydyn.
The pistons received a moly-teflon based coating on the skirts, and an extreme-duty ceramic
coating on the piston tops. The cams and engine bearings received an oil retentive coating to further reduce friction and ensure lubrication in the slim chance that the engine is momentarily oil-starved. Of specific concern, the cams received this coating on the lobes and not on the rotating journal surfaces. The oil retentive coating is approximately .003-.004" thick and DOES affect the bearing clearances. As a result, we decided to NOT coat the cam bearing journals since there is really no easy method of regaining the clearance that is consumed by the coating. Although the cylinder head had previously received ceramic coatings during the previous engine rebuild, I had these coatings
removed and reapplied with Polydyn's extreme ceramic coating, along with the exhaust manifold and turbocharger tubine housing. The crank and rods were also coated with an oil-shed coating
which facilitates a reduction in oil windage in the crank area.
The JUN Connection
Words cannot begin to describe the JUN parts. They are a work of art every bit as much as they are a work of engineering. Everyone that's seen these parts has been
struck with a sense of awe and amazement. Professional
racing-engine builders with twenty-some-odd years experience in the
business were astonished with the accuracy and precise nature of these
parts. They are that good. Pistons, perfectly round, not oblong.
Rods, identical in every dimension (weight, length, size). Crank, absolutely mint in every dimension.
Pistons and rods all within perfect balance of one another. Not 1 gram difference, not 1/2 gram, not even a 1/8 gram difference in weight.
They were absolutely perfect. Considering their cost, these parts better be
perfect!!! They are designed to withstand 40 psi of boost and a
10,000 rpms redline. However, amid the wonder of these expensive yet awesome parts, we did discover a faux-paw screw-up on JUN's part. Seems as though one of the wrist pins was not
properly chamfered on one end, thus preventing full engagement of one of the wrist-pin retaining clips.
I had to ship this piston, wrist-pin and clips, back to JUN in California so they could verify the error and send me a correct part.
Amazingly, I shipped these parts next-day UPS red label on the Friday before Labor Day, and received my original piston along with a new wrist-pin and clips on the following Wednesday. That's about as quick as I can imagine any company could possibly respond
to the need to replace a defective part. I have to give a hand to John at JUN in
how he handled this issue. He had never seen this type of error with JUN's parts, and was quite surprised. Although there is something
disconcerting about being the (un)lucky one to find a flaw in a JUN part, I tend to believe that this was an unusual and isolated incident and
I have no concerns in recommending JUN parts to others or using them again in
the future.
Flywheels 'R Us
For what it's worth, I should also mention that JUN convinced me to replace my *new* ClutchMasters aluminum flywheel with
one of their chromoly flywheels. They claim that their research has demonstrated excessive crank harmonics as a result of the flex of aluminum flywheels spinning at 8000 rpms or higher. So, (big sigh) I went ahead a bought a JUN flywheel.
Thankfully, my JUN supplier provided it to me at their cost.
Tranny Swap Summer - Summer &
Fall 2002
On May 21, 2002, I had The Shuttle
ferried up to Alamo Autosports for a handful of mods I wanted to get installed
over a long vacation break. The write-up
has all the details...
More to come at a later date.
|
|
Return to The Shuttle's home page |